
Primavera P6 Tutorial : Chapter 2.8 : Calendars

The calendars define the number of available work hours in each calendar day. You can then create and assign calendars to each resource and each activity. The Primavera module uses your calendar for scheduling and tracking activities, and also leveling resources across your organization. You can link resource and project calendars to global calendars.
In this Chapter, let us learn how to add calendars and how to modify them.

Add Calendars:

You can create an unlimited number of calendars to accommodate different work patterns in your organization. You can create different calendars and assign the activities and resources in your projects to them.
Basically there are three calendar pools: Global, Resource, and Project.

The global calendar pool contains calendars that apply to all projects in the database.
The resource calendar pool is a pool of calendars for each resource.
The project calendar pool is a pool of calendars for each project in the organization.
You can assign either of the resource or global calendars to resources, and either of the global or project calendars to activities.
To Create Calendar:
Go to Menu bar, Choose Enterprise, Calendars. Choose Global, then click Add.


Select the calendar you want to copy for the new global calendar, then click the Select button

Type the new calendar’s name. To edit the new calendar, click Modify.

To view the calendar’s assignments before changing it, click Used By.

Follow the same procedure for adding the resource or project calendar. Only difference is that you must first open a project, when creating a project calendar.
Use more than one calendar when your projects contain activities that can occur on different schedules. The Primavera module schedules each activity only during the work times of the calendar to which it is assigned.

Modify Calendars:

To modify: Go to Menu Bar, Choose Enterprise, Calendars; choose the calendar type (Global, Resource, or Project), select the calendar you want to modify, then click Modify.
To change the number of hours in a specific workday, click the date you want to change and edit the work-hours /day.

To Specify default work hours:
In the calendar dialog box, click Workweek. Use the Calendar Weekly Hours dialog box to specify the number of default work hours for each week day in the open calendar.

If we edit the existing calendar and change the Saturday’s work hours as non-working, the color will be changed as shown in the below figure.

To Define default hours per time period:
In the calendar dialog box, click Time Periods and define the calendar's default number of hours per time period.

If you click the detailed work hours per day. You can either click to make the selected hour a work hour or click to make the selected hour a non-work hour.

You can set preferences to display time units in increments such as Hour, Day, Week, and Month. This can be done by going to Edit>>User Preferences

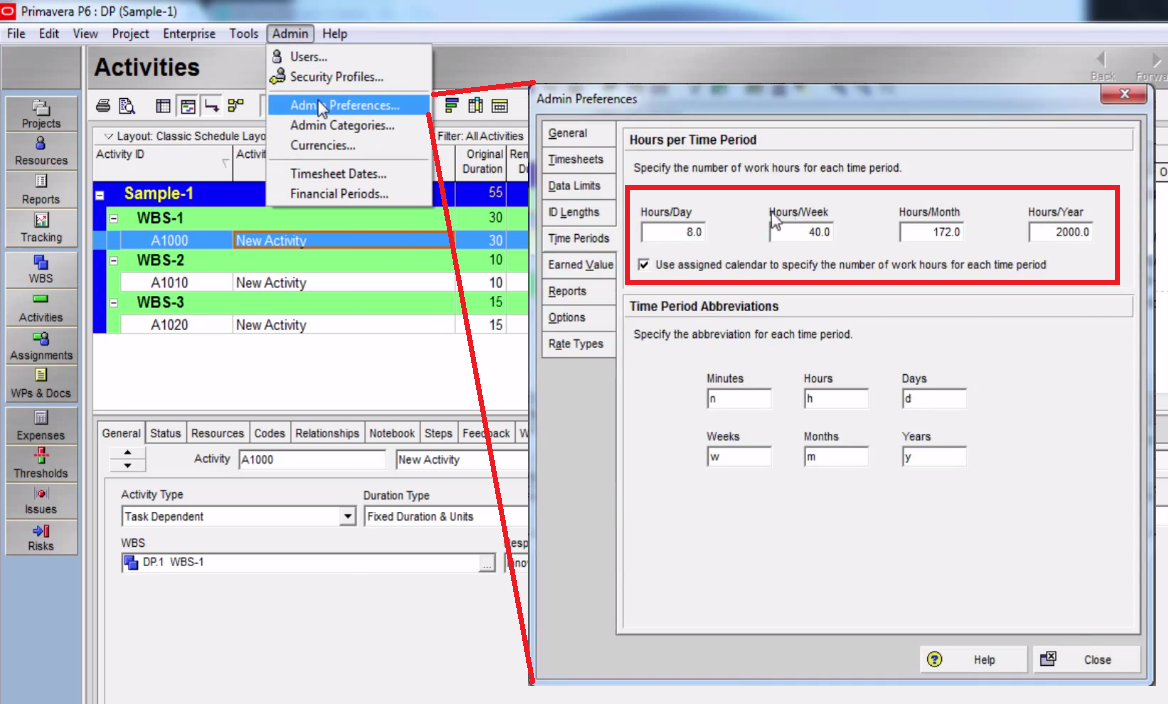
Administrators can define Hours per Time Period settings globally on the Admin Preferences, Time Periods tab, or they can specify that the Hours per Time Period settings should be defined per calendar.

Here is an Illustrative video tutorial of the same for better understanding:
[paypal_donation_button align="center"]

Comments

Popular posts from this blog

How To Merge Two Separate Schedules Into One Master Schedule In Primavera

In this tutorial, let us learn how to Merge two separate schedules into One Master schedule in Primavera P6. In this example, I am considering two separate projects which are these two, One is master schedule and one is the subproject. First, let us open the subproject and export this schedule as a .XER file onto Desktop. and now let us start the exact process of merging two separate schedules. 1. As a first step, We need to open the project schedule into which we want to insert the other project as a sub-project. So, let us open the Master schedule here. 2. Go to Import, select XER format, Click Next 3. Select Project and click Next 4. Now select the Subproject .xer file from the Desktop and click Next 5. Under Import action, select the option as “Update Existing Project” and under import to section, select the Master schedule which is already open. Click Next and Finally Click on Finish. 6. Please note and make sure that your WBS and activity IDs should not confl...

Primavera P6 Tutorial : Chapter 2.5 : Budgets

Budget Consists of quantities and cash flow required to complete a project. In the Planning stage project manager and other stakeholders need to estimate scope and budgets. As the scope changes, budget also needs to be adjusted to compensate. Primavera is helpful in establishing these budgets and tracking the changes in the budgets. In this Tutorial, let us learn how to establish budgets, establish monthly spending plans, implement changes to it and tracking monthly spending and variances right from EPS to Project and to WBS level. In the planning stage, we start the budgeting from the top level, like dividing the budget available to the EPS nodes for the duration of the projects. And then respective managers divide this budget to the projects for which they are responsible in each EPS node. Let us consider with an example here. Considering that we have $6000 allotted for an EPS node and it is having two projects and we divide this $6000 equally to these two projects as $3000 eac...

Primavera P6 Tutorial : Chapter 2.7 : User Defined Fields

Apart from the in-built fields available in primavera, you can create User-defined fields which enable you to customize fields and values and add them to the project database. For example, you can use them to track additional activity data such as ordered dates, delivery dates, revised budgets, purchase order / work order numbers, vendor names, etc. In this chapter, let us learn how to create User defined fields, how to work with them and how to work with indicators type of User defined fields. How to Create UDFs? For each custom user defined field you create, you can specify any of the following data formats for that field: Text, Start Date, Finish Date, Cost, Integer, Number, Text, and Indicator. To Define: Go to the Menu bar, Choose Enterprise, select  User Defined Fields . Select the subject area to which you want to add a new field, then click  Add . Double-click in the Title column and type a name for the User Defined Field. Double-click in the Da...