
Primavera P6 Tutorial : Chapter 2.9 : Activity Codes

You can define set of Activity codes to categorize the activities in your projects. You can then use them to group, sort and filter activities according to the activity codes and values you assign.
In this tutorial, let us learn how to use global codes to organize project activities across an enterprise project structure (EPS) according to specific categories, such as discipline, product and division. Also, let us learn how to establish project activity codes to filter and organize activities based on unique, project-specific requirements.

Creating Activity Codes

To create global activity codes: Go to Menu Bar, Choose Enterprise and click on Activity Codes.

Choose Global.

Then click Modify. Click Add, then type the name of the global activity code. Specify the maximum number of characters for the activity code’s values.

To create global activity code values: Choose Enterprise, Activity Codes. Choose Global. Select the activity code for which you want to create a value.

Then click Add. Type the value’s name and description.


To Create EPS-level activity codes: Choose EPS, then click Modify.

Click Add to select the EPS to which you want to apply the activity code. Next, type the name of the EPS activity code.

Specify the maximum number of characters for the activity code’s values.
To create EPS-level activity code values: Choose Enterprise, Activity Codes. Choose EPS. Select the activity code for which you want to create a value.

Then click Add. Type the value’s name and description. The value cannot exceed the maximum character length specified for the activity code.

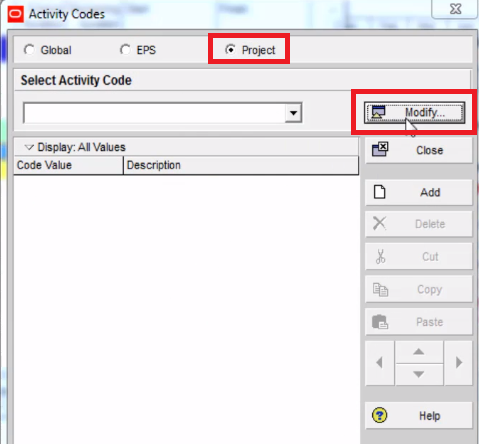
To create project-level activity codes: Firstly Open the project for which you want to create activity codes, then choose Enterprise, select Activity Codes.

Choose Project, then click Modify.

Click Add, then type the name of the project activity code. Specify the maximum length of characters for the activity code’s values.

To create project-level activity code values: Go to Menu Bar, Choose Enterprise, Select Activity Codes. Choose Project. Select the activity code for which you want to create a value.

Then click Add. Type the value’s name and description. Remember that the value cannot exceed the maximum character length specified for the activity code.

How to convert EPS-level activity codes and values?
You can convert an EPS-level activity code and its values to a global activity code along with global values. To do this, go to Menu bar, Choose Enterprise, select Activity Codes. Choose EPS, then click Modify. Select the code you want to convert, then click Make Global. Click Yes to convert the code and its values.

How to convert project-level activity codes and values?
You can also convert a project activity code and its values to a global activity code along with global values. Go to Menu Bar, Choose Enterprise, and select Activity Codes. Choose Project, then click Modify. Select the code you want to convert, then click Make Global. Click Yes to convert the code and its values.

Grouping and Summarizing by Activity Codes

Use activity codes (global, EPS, and project) to group activities and projects in Activity Table, Gantt Chart, and Activity Network layouts. Grouping helps you to focus on specific activities.
To Group by activity code
In the Activities window, click the Layout Options bar, choose Group and Sort. Under Group By, select the project, EPS, or global activity code by which you want to group.

Summarizing groups

To display summary bars in the Gantt Chart, click the Layout Options bar, choose Bars to display the Bars dialog box.

Tick the checkbox in this dialog box to display the summary bars as shown here.

Here is the detailed video tutorial for your better understanding:

[paypal_donation_button align="center"]

Comments

Popular posts from this blog

How To Merge Two Separate Schedules Into One Master Schedule In Primavera

In this tutorial, let us learn how to Merge two separate schedules into One Master schedule in Primavera P6. In this example, I am considering two separate projects which are these two, One is master schedule and one is the subproject. First, let us open the subproject and export this schedule as a .XER file onto Desktop. and now let us start the exact process of merging two separate schedules. 1. As a first step, We need to open the project schedule into which we want to insert the other project as a sub-project. So, let us open the Master schedule here. 2. Go to Import, select XER format, Click Next 3. Select Project and click Next 4. Now select the Subproject .xer file from the Desktop and click Next 5. Under Import action, select the option as “Update Existing Project” and under import to section, select the Master schedule which is already open. Click Next and Finally Click on Finish. 6. Please note and make sure that your WBS and activity IDs should not confl...

Primavera P6 Export To Excel And Color WBS Levels Automatically || How To Color WBS Levels

In this tutorial, let us learn how to Color WBS levels after Primavera P6 Export To Excel. After exporting activity table from Primavera P6 to Excel, it’s very hard to tell which activity belong to which WBS. So in this tutorial, let us see how to color WBS levels automatically so we can have a report like in Primavera P6. This is my sample schedule in primavera, 1. I press Ctrl+A to select entire data and copy the data and then go to Excel sheet and paste it. 2. Add a column left to Activity Id i.e column A and name it as WBS level to show the WBS level for each activity. 3. enter the formula in Cell A2 as = =((FIND(TRIM(B2),B2))-1)/2 4. Hit enter and then apply the same formula to all the cells in column A to see WBS level for each activity. 5. See now, you can view the WBS level for each activity this way easily in Excel after exporting the Primavera P6 Schedule. And Now let us color the WBS levels. 1. Select the entire Data range. 2. Go to Conditional F...

Primavera P6 Tutorial : Chapter 2.7 : User Defined Fields

Apart from the in-built fields available in primavera, you can create User-defined fields which enable you to customize fields and values and add them to the project database. For example, you can use them to track additional activity data such as ordered dates, delivery dates, revised budgets, purchase order / work order numbers, vendor names, etc. In this chapter, let us learn how to create User defined fields, how to work with them and how to work with indicators type of User defined fields. How to Create UDFs? For each custom user defined field you create, you can specify any of the following data formats for that field: Text, Start Date, Finish Date, Cost, Integer, Number, Text, and Indicator. To Define: Go to the Menu bar, Choose Enterprise, select  User Defined Fields . Select the subject area to which you want to add a new field, then click  Add . Double-click in the Title column and type a name for the User Defined Field. Double-click in the Da...